Adding/Removing members to Groups in Outlook365
Add members to a group
- Open Outlook for Windows.
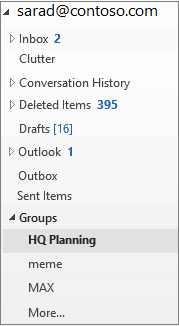
- Under Groups in the left folder pane, select your group.

- On the Groups ribbon, select Add Members .
- In the Add Members box, search for people within your organization either by their full name or email address, and then select the names to add.
- Click OK .

You can't edit group membership using the Address Book. If you try to add or remove members using the Address Book, you may see an error.
Add guests to a group

When you add guests (also known as external users) to a group, you're granting them access to all information within the group. This includes emails, calendar, project notes, project files, and project plans. Guests don't see a Groups node in their navigation pane in Outlook but do receive group emails and links to files through their inbox.
The groups header indicates when guest users are included in the group, as shown in this example.
When you invite a guest to join a group, they will be notified by email that they've been added. They'll begin to receive group conversations and calendar events in their inbox. But guest members do have limitations as to what they can see and do in a group. For example, guests can't:
- Be group owners
- View the global address list
- View all information on group member contact cards
- View membership of the group

The group owner can revoke guest access at any time.
- Open Outlook for Windows.
Under
Groups in the left folder pane, select your group.

On the Groups ribbon, select Add Members .
In the Add Members box, enter the email address of the guest and press Enter .
Select OK .
Remove a member from a group

Only group owners can remove members
- Under Groups in the left folder pane, select your group.

- On the ribbon, select Edit Group .
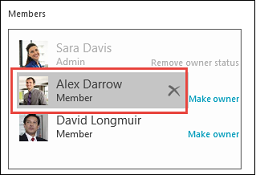
- In the Edit Group box, point to the name of the member you want to remove, and click the X .

Related Articles
Adding/Deleting Members to an Outlook Distribution List
Please note that you must be an owner of an Outlook Distribution List to modify its members Open the Outlook desktop application. Go to the Home tab and select Address Book. In the Address Book window, click the All Distribution Lists. In the Search ...
Outlook 365 Phone Setup
For those who have a town issued phone, below are instructions on how to set up your new Office 365 email on your phone. If you do not have a town issued smartphone and would like to do this, please consult your supervisor first. Make sure your phone ...
Open and use a shared mailbox in Outlook
A shared mailbox makes it easy for a group of people to monitor and send email from a public email alias like info@contoso.com. When a person in the group replies to a message sent to the shared mailbox, the email appears to be from the shared ...
Missing emails or meeting invites
If you are having issues with receiving emails and the emails not showing up in your inbox, turning off Cached Exchange Mode can help resolve this issue. Please follow the steps below. If you are still having issues after changing the setting, please ...
Password Reset
Forgotten Password If you DO NOT REMEMBER your password, please submit a ticket with IT and someone will create a temporary password. Once this is done, please return to this page for directions on how to reset your password. Password Change in ...


